Welcome to my
Korona 12x20 page
1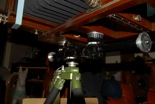 2
2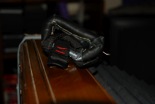
3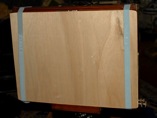 4
4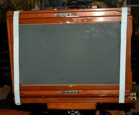
5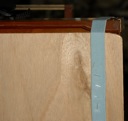
23
45
Its been a
marvelous adventure! Thats the best way to put it.
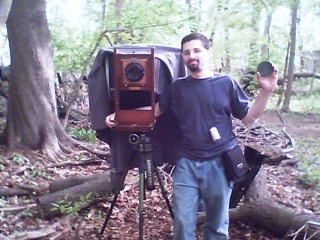
About 50 or 60 years ago my grandfather bought a photo studio in Long Island, NY.
It was a complete package with all of the equipment. Deep down in the basement was the Korona.
He never had a use for the large size but he kept it.
Last year (2007) I found it in his garage an decided to fix it up in my spare time.
It took me about 3 months to clean and polish the whole camera. I even tried to fix the bellows.
That turned out to be a bad idea. I sent the camera to Turner Bellows for a new one.
They did a great job. Unfortunately UPS damaged the box on the way to Turner so it added some more time. When I got the box back from Turner I realized that UPS did a real number on the camera. So another month went by and the additional damage was fixed.
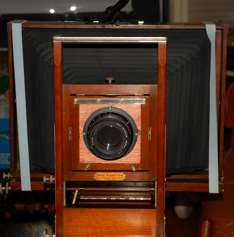
In July 2007 I managed to get a 480mm f/9 APO Nikkor barrel lens from Adorama. Its was a spectacular find. The lens goes from f/9-128 by twisting the front of the barrel. The lens was probably from a large copy camera so field distortion and chromatic aberration are kept to a minimum compared with other lenses. I then had to mount it on the camera. So I went to Home Depot and bought some wood and varnish. I made a lens board and cut the hole out with my Dremel. I decided to take a break until I could find some film and that brings us to 2008.
In March 2008, I managed to buy 3 boxes of Ilford HP5 12x20. It was only outdated by a few years. I actually prefer HP5 thats a bit seasoned, but more on that later.
As soon as the film arrived, it spurred a re-interest in getting the whole thing ready to shoot.
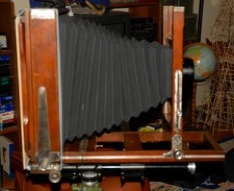
The first task was a way to mount it on a tripod. The camera is heavy, over 15 pounds without the lens. Since it was manufactured in the US (Rochester NY), it has 2x 1/4" tripod sockets on the bottom. Why in the world would you use something that small on something so big is beyond me.
But thats what I had to work with. It was pointed out to me that the US at the time only used 1/4" and the European's used 3/4". After banging my head against the wall for a while and debating between a 1 or 2 tripod setup, I figured it out!
I used my large Bogen 3000 series green tripod. About a year ago I bought a dual tripod attachment (from Amvona) to shoot tabletop images (see #1 on the right). But it has 3/4" tripod studs.
I went to B&H (April 2008) and bought 2 Bogen tripod adapters. Viola! It works. I can carry it around on my shoulder and its a very sturdy setup.
My second task was a handle. The original one disintegrated years ago. This was the hardest thing to replace. I spent hours trying to find someone to make me a new one in the city. No one wanted to do it. I was ready to give up, when I had an epiphany. When I looked down at my bag,
I saw a carabiner thats attached to my bag. They are a perfect fit for the job. I went to EMS Sports and bought a leather sewing kit and used some leather I found in a NYC dumpster. I wrapped the carabiner with the leather and sewed it up (see #2 on the right). I attached it to the camera with strap from EMS. Perfect!!
#3-5 show my latest stroke of genius. I needed a way to protect the ground glass from potential damage. I saw some on ebay but they are expensive. I had enough wood left over from the lens boards so I cut it a bit larger than the back. But how to keep it on.....In the same dumpster I found all the leather in, I found a roll of 1" wide elastic belt. You can see from #3 how it holds the GG Protector on. #4 is the best part of the elastic band.
If you have ever tried to pull a dark slide thats this large, you know that most likely you will pull the holder away from the back of the camera. Light leaks, AHHHHHH!!! This elastic band I made by stapling the 2 overlapping ends together (see #5) keeps the back tight to the camera.
The first week in May 2008, I took the 1 good film holder I have and took it apart. Thoroughly cleaned it and re-glued everything. A tip I got from the newsgroups is to coat the edges of the dark slide with graphite. I took a pencil and rubbed it down the whole length of the slide and on the top of the ribs inside the holder.
Click here for the rest of the story and my first 12x20 pictures.
About 50 or 60 years ago my grandfather bought a photo studio in Long Island, NY.
It was a complete package with all of the equipment. Deep down in the basement was the Korona.
He never had a use for the large size but he kept it.
Last year (2007) I found it in his garage an decided to fix it up in my spare time.
It took me about 3 months to clean and polish the whole camera. I even tried to fix the bellows.
That turned out to be a bad idea. I sent the camera to Turner Bellows for a new one.
They did a great job. Unfortunately UPS damaged the box on the way to Turner so it added some more time. When I got the box back from Turner I realized that UPS did a real number on the camera. So another month went by and the additional damage was fixed.
In July 2007 I managed to get a 480mm f/9 APO Nikkor barrel lens from Adorama. Its was a spectacular find. The lens goes from f/9-128 by twisting the front of the barrel. The lens was probably from a large copy camera so field distortion and chromatic aberration are kept to a minimum compared with other lenses. I then had to mount it on the camera. So I went to Home Depot and bought some wood and varnish. I made a lens board and cut the hole out with my Dremel. I decided to take a break until I could find some film and that brings us to 2008.
In March 2008, I managed to buy 3 boxes of Ilford HP5 12x20. It was only outdated by a few years. I actually prefer HP5 thats a bit seasoned, but more on that later.
As soon as the film arrived, it spurred a re-interest in getting the whole thing ready to shoot.
The first task was a way to mount it on a tripod. The camera is heavy, over 15 pounds without the lens. Since it was manufactured in the US (Rochester NY), it has 2x 1/4" tripod sockets on the bottom. Why in the world would you use something that small on something so big is beyond me.
But thats what I had to work with. It was pointed out to me that the US at the time only used 1/4" and the European's used 3/4". After banging my head against the wall for a while and debating between a 1 or 2 tripod setup, I figured it out!
I used my large Bogen 3000 series green tripod. About a year ago I bought a dual tripod attachment (from Amvona) to shoot tabletop images (see #1 on the right). But it has 3/4" tripod studs.
I went to B&H (April 2008) and bought 2 Bogen tripod adapters. Viola! It works. I can carry it around on my shoulder and its a very sturdy setup.
My second task was a handle. The original one disintegrated years ago. This was the hardest thing to replace. I spent hours trying to find someone to make me a new one in the city. No one wanted to do it. I was ready to give up, when I had an epiphany. When I looked down at my bag,
I saw a carabiner thats attached to my bag. They are a perfect fit for the job. I went to EMS Sports and bought a leather sewing kit and used some leather I found in a NYC dumpster. I wrapped the carabiner with the leather and sewed it up (see #2 on the right). I attached it to the camera with strap from EMS. Perfect!!
#3-5 show my latest stroke of genius. I needed a way to protect the ground glass from potential damage. I saw some on ebay but they are expensive. I had enough wood left over from the lens boards so I cut it a bit larger than the back. But how to keep it on.....In the same dumpster I found all the leather in, I found a roll of 1" wide elastic belt. You can see from #3 how it holds the GG Protector on. #4 is the best part of the elastic band.
If you have ever tried to pull a dark slide thats this large, you know that most likely you will pull the holder away from the back of the camera. Light leaks, AHHHHHH!!! This elastic band I made by stapling the 2 overlapping ends together (see #5) keeps the back tight to the camera.
The first week in May 2008, I took the 1 good film holder I have and took it apart. Thoroughly cleaned it and re-glued everything. A tip I got from the newsgroups is to coat the edges of the dark slide with graphite. I took a pencil and rubbed it down the whole length of the slide and on the top of the ribs inside the holder.
Click here for the rest of the story and my first 12x20 pictures.
Please Note: Updates will be
posted on the blog